Axapta programming blog: practical HOWTOs

Wednesday, November 22, 2006

How to build Axapta application from XPO files stored in Visual Source Safe.

I have noticed that topic about version control in Axapta has become very popular, especially after DAX 4.0 has been released, so I decided to write a couple of more blog posts about it. In this post I am going to discuss how to build up Axapta application from those hundreds of XPO files you have in your Visual Source Safe database and moreover do it automatically without any human interaction, so you can put it on the schedule and execute every night or so.

Basically, the main idea of building Axapta application from XPOs is just to import them into your working layer over the core Axapta application (system layers which stands below your code) in order to create an AOD file, which after that can be put on the test environment or delivered to the customers, partners and so on. And so the first question that will come up is how should we do this – should we just import them one by one or is there any way to combine them all together or may be we can do a bulk import? Michael Fruergaard Pontoppidan, on his blog (mfp's two cents), has recently published this great tool called “CombineXPOs” which is IMHO a brilliant way of solving this problem. Click here to download. This tool will automatically traverse all your folders and subfolders hierarchy and compile together all XPO files it can find in there. So using this tool I have created a couple of scripts which can automate the whole process and probably put your development life cycle on a bit higher excellence level.

The first thing that we need to do is to synchronize all XPOs from VSS and compile them all into one big XPO file. To do so, I have created a small script “sync.cmd” which will: switch to my VSS working folder and use simple VSS “get” commend like this:


ss Get $/%project_name% -GTM –R


where the %project_name% is the name of the project as it appears in VSS. After it’s done, I call “CombineXPOs” tool like this:


CombineXPOs.exe %layer% %layer%.xpo


Where the %layer% is the name of the layer you are trying to assemble. I also assume that folder which containing XPO files is also called the same as layer and it stands under the project name in your VSS working folder.

When the first script is executed I am calling another script “updatenv.cmd”, which is doing the actual import into my Axapta “build” environment. I call it “build” environment because I use a little temporary application patch during this process in order to automate it, but I will get back to it later. So, the second script takes combined XPO file moves it to the root folder like “C” drive and then pass it to Axapta like this:


ax32.exe "%conf_dir%\%conf_file%" -internal=noModalBoxes
-startupcmd=AOTImport_%combined_xpo%


where %combined_xpo% is the path to the xpo file (something like this “C:\usr.xpo”) and %conf_dir% and %conf_file% are configuration file path and file name appropriately. -internal=noModalBoxes switch prevents Axapta from different pop-ups during the process.

After import is completed we only need to compile and synchronize our new application. In order to compile I call the similar command line:


ax32.exe "%conf_dir%\%conf_file%" -internal=noModalBoxes -startupcmd=compileall


and to synchronize our application with database, I used string like this:


ax32.exe "%conf_dir%\%conf_file%" -internal=noModalBoxes -startupcmd=synchronize


After these two processes completed we can grab our new AOD file from the application folder and put it into the drop share with date or build number stamp on it.

The only thing left to discuss is that little application patch that I promised to get back to. The thing is, that in Axapta 3.0 there are a couple of obstacles preventing importing process to be 100% automatic. First thing is that during import process Axapta kernel asks user if it’s ok to overwrite existing (on the lower layers) objects. And the second problem is that Axapta never shut down itself after import completed but we actually need it to close, because of other procedures – like, for example, compilation and synchronization of the application which should follow after it. So, how I solved that, is simply by creating some X++ code in USP layer and putting it in my “build” environment before importing XPO and removing it after build process completed. What exactly I have created in X++ is two things. First, in the class “SysStartupCmdAOTImport” added this line of code at the end of the method “infoRun”:


infolog.shutDown(true); //Jobs done


and also, in the class “Box”, commented out content of method “yesAllNoAllCancel” and have put


return DialogButton::YesToAll;


at the end of the method. This string will make sure we have always YesToAll button pressed during the import process.

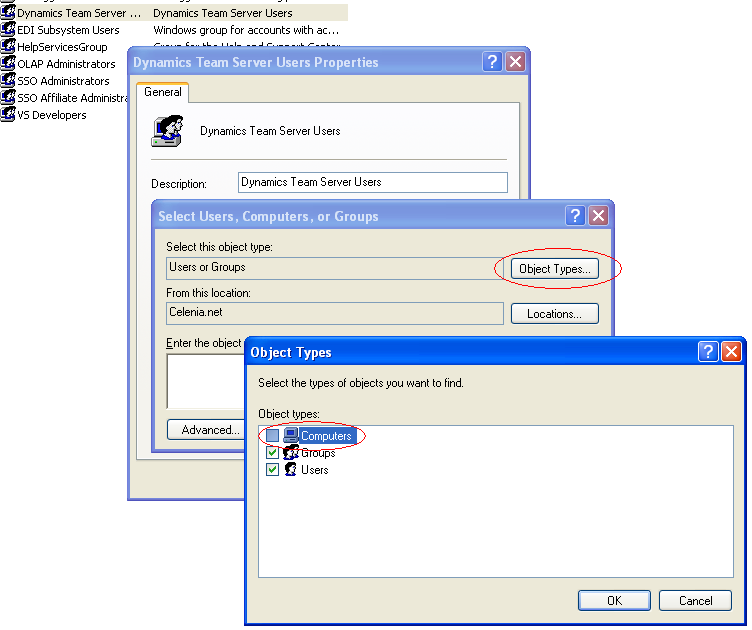
And the last thing to remember is that you need to set your Windows network account as a "network account name" for your Axapta admin user to be able to logon automatically in Axapta. This should be done here: "Main menu/ Administration/Users/General/Network account name".

Wednesday, September 20, 2006

How to make Dynamics AX interface more user friendly with Tabax?

Does it sound familiar for you when you work with Axapta you get heaped with different windows after some time? Maksim Belugin has developed a great tool called Tabax to help organize all your opened windows into tabs, quickly change their positions and so on. Tool and more information about it can be found on the front page of www.axaptapedia.com.

I have just started to use this tool and I think its really great and can make life much easier for Axapta developers. Tabax designed for Axapta 3.0 and, as author says, tested with Axapta 3.0 SP4. I have tried to use it with Axapta 4.0 and found that with just a few small modifications you can run it on Microsoft Dynamics AX 4.0 as well.

Here they are, my changes to Tabax version 0.2.4 to make it work with Dynamics AX 4.0:


1. Open method Pathes and comment out this string:
//["\\Data Dictionary\\Feature Keys\\", #imageFeatureKey],

since there are no any feature keys in Axapta 4.0. Also add one more string
["\\Data Dictionary\\Perspectives\\", #imagePerspective], // added

2.Open unpack method and modify it like it shown here:

if((conlen(packedMenuUsageStatistics) > 4)) { // added

menuUsageStatistics=Map::create(packedMenuUsageStatistics);

if(!menuUsageStatistics)

menuUsageStatistics=new Map(Types::String, Types::Container);

} // added


I haven't got enough time to test it with Axapta 4.0, so it might have more issues, but at least it works with these modifications in place. Hopefully Maksim will make a full test of it with Dynamics AX 4.0 and present us with a new version of his great tool in the nearest future.

How to learn Axapta programming: “MorphXIT: an introduction to Axapta and the MorphX Development Suit”

I have recently read the book "MorphXIT: an introduction to Axapta and the MorphX Development Suit". It is very well written and put together book. Easy to read and understand even for not native speakers like me. Author is very experienced Axapta developer in a friendly style sharing his knowledgege in Axapta programming. Always straight to the point highlighting key things of every aspect.
I am very much excited about this book, and found there many tips and tricks I didn't know before. So, even though this book mostly dedicated to Axapta newbies, I think it will be interested and helpful for experienced developers as well. Ideally, in my opinion, will be right for people who already have some small experience with Axapta, something like 3-6 months for example.
You can find more information about it here: www.steenandreasen.com

Thursday, June 15, 2006

Notes about my experience in setup of Microsoft Dynamics AX 4.0 integrated with Microsoft Visual Source Safe.

Having in mind that, according to “what’s new“ document, the main focus in improvement of development tools in Axapta 4.0, was to support larger development organizations with multi-site development, I made an assumption that version control integration is probably one of the most important advance in development tools in the new version of my favorite Microsoft product. So, I started my acquaintance with Microsoft Dynamics AX 4.0 from setting up its new and so long-awaited feature – VSS integration. In this blog I will not repeat setup instructions, I just would like to share my first experience in setup and configuration of Microsoft Dynamics AX 4.0 and its build-in Visual Source Safe (VSS) integration.


In my configuration scenario I have one common AOS server, one common SQL server and one VSS server installed on the same physical box. Also, one Team Server installed on another box. Separate Axapta client was installed on each developer’s machine together with VSS client of course. Also, separate repository folder was created on each developer’s machine, as it is required by installation documentation. In general it wasn’t difficult to setup VSS integration and to configure all client machines. But there were a few obstacles and nuances which I would like to draw your attention to. First thing that you should have in mind before you start your own installation of Axapta 4.0 integrated with VSS, is that new version of Axapta works only with new version of Microsoft VSS! Only Visual Source Safe 2005 is supported. If you already have for example Visual Source Safe 6.0 installed you will need to upgrade it before using it with Axapta 4.0. Otherwise you will end up with error saying: “VSS Connection Error”.


I have seen it as a common mistake of some other developers who first time tried to configure Axapta 4.0 with VSS, since in my opinion, it’s not quite clear from the error message why VSS can’t be connected and there is not so much attention in the official documentation to the fact that only new VSS is supported.


When you have upgraded your version of Microsoft Visual Source Safe and successfully connected Axapta with it, another installation step needs to be performed – setup and connection to the Team Server. By design, Team Server instance has to be installed on the separate machine then AXDB SQL database and AOS server. In my installation scenario I have separated them as well. But if you have installed everything on the same box and Infolog with error: “[Microsoft][ODBC SQL Server Driver][SQL Server]Cannot open database requested in login 'AXTS'. Login fails” appears - try to solve this issue, by manually creating NT AUTHORITY\NETWORK SERVICE user on that box to have all services working together. Also, make sure you have SQL, which holds Team Server’s database, with Windows authentication turned on like it shown on the picture:


After installation of Team Server, new local user group needs to be created on the Team Server’s computer. This group should be granted with access to the AXTS database which was created during Team Server installation process.


Next step of configuration of Team Server is setting up its authorized users. Each developer’s computer that has AOS installed must be added as a user on the Team Server. It means that you have to add AOS holding computer names to that new user group created on the machine running Team Server. To do so, you have to go to “Computer Management/Local Users and Groups/Groups”, find your team server group and add your AOS holding computers like it shown on the picture:


When all previous steps are completed and you have successfully installed all necessary components you need to add your label file to the VSS version control system and create repository of objects on your local hard drive and also add them into VSS database. Before you do so, you need to create local folder which will hold repository and setup VSS parameters in Microsoft Dynamics AX client.


In order to create repository folder simply open windows explorer and create new folder, for example “C:\REP”. Then go to Tools/Development Tools/Version Control/Setup/System Settings and set your VSS integration parameters. Setting of parameters is quite simple and self-explanatory. Just enter your VSS server and Team Server settings in the appropriate fields and press apply. Then you will have to confirm that you would like to change your global development settings and system will create VCSDef.xml file and will add it to the VSS database.


Now, we are ready to create label file. Go to Tools/Development Tools/Version Control/Setup/Create Label File. In the form shown, type some description for VSS history records and press OK. After that one problem that could appear is: “Error Message Unable to flush the label file.” This can happened when NETWORK_SERVICE account doesn’t have permissions to rename files in the application folder. The thing is, when label file should be flashed, AOC is writing everything in to an .alb file and then tries to rename it to standard .ald and if it doesn’t have permission to do so, error appears. To fix this, add NETWORK_SEVICE account to the application folder with appropriate permissions.


Creation of repository is one time action needed to complete setup of Axapta 4.0 with version control system. Microsoft Dynamics AX 4.0 application consists of four application files for each layer: .aod file which contains business logic and other three files which contain documentation and labels. New version control system management integrated with MorhX development suit allows to include all these parts of Axapta application into version control system. To put business logic into the version control system, it was split into many small XPOs. The smallest, atomic piece of application has been chosen to be an object. It means that even if we have updated only one method within a class, whole class will be updated in the VSS. All these XPOs have standard native export format for MorphX and needs to be exported from the application in order to include them into version control system. That’s why, when you first time installing Axapta 4.0 with version control, you need to create repository by exporting all objects from your current layer and adding them into the version control database. The process is rather simple, but could be quite time consuming depending on size of your layer. I haven’t had any difficulties creating my repository. So, if you just follow those simple steps described in the “what’s new” document, I believe you wont have any difficulties as well. Go to the “Tools/Development Tools/Version Control/Setup/Create Repository”, in the shown window add small description for the history and press OK.


All other Axapta clients installed on different machines don’t need to follow the same procedure to create repository, they just need to get synchronized before they start their work.


The last thing you should pay attention to, before you start using VSS integration with Dynamics AX 4.0 is Best Practice Settings from Version Control Configuration window. There you can set an acceptable level of quality allowed for check-in.


It seems to be very cool feature, but I was a bit disappointed by the fact that system didn’t allow me to setup different levels of diagnostic level for the compiler.


Whatever level I have set in the compiler setup window, when I try to check-in my objects, system has automatically changed that setting to the highest, level 4, and didn’t allow me to check in if errors/warnings were found. Moreover this setting was never changed back to the level I had in my configuration before I do check-in, so I had to remember to change it back myself when compiling my application next time. This was very annoying and at the end we decided to turn off best practice bar at all.


One more issue I have noticed was when I started to work with labels. The thing is, when you have created new label in multilingual environment, system doesn't see this label even though this label exists in the ".ald" file! Only when you have your client restarted you will see your label. Until then, for Axapta, this new label will exist only in the label log and not in the ".ald" which will also cause a best practice error when you try to check-in your object with new label set in the its properties.


Well, in spite of all these small issues, setup was not difficult and my team and I were very happy with new feature of Microsoft Dynamics AX 4.0 - Visual Source Safe (VSS) integration. It really improves whole product development life cycle and brings development process on the next level of teamwork. I would definitely recommend you to start using VSS integration.

Thursday, April 06, 2006

How to setup Axapta batch server running as user defined windows service

Batch processing allows you to run a job, that requires a large amount of computer power, on another, faster computer. Batch jobs, once they are activated to run, are sent to a batch list, where they are queued, and will eventually be ran. This allows you to have jobs run without tying up your computer's power, meaning that you can continue to work while your job is being run. But, you should have in mind that it's not enough to schedule your job in Axapta using a Batch tab on the form. Even though your job will be put into a queue, it will not be executed until Axapta is started as a batch executer (processing instance). In order to have this kind of Axapta running you can simply start one more instance of Axapta client and go to Basic -> Periodic -> Batch -> Processing


specify there batch group which this instance should take care of and that's basically it. But, having one more instance of Axapta running will make you a trouble when for example server was suddenly restarted. In order to start an Axapta client as a batch server instance you can specify special command line parameter using -startupcmd switch.

It should look like this: -startupcmd=batch.

The starting of batch using -startupcmd parameter involves these four classes:

Application,
SysStartupCmd,
SysStartupCmdBatchRun and
BatchRun

In order to specify a batch group using the -startupcmd parameter use this kind of startup parameter: startupcmd=batch_invoice

The thing is, that SysStartupCmd class takes any '_' sign as a separator for the startupCmd, treating batch_invoice as the command batch with invoice as the parameter. The Application class redirects control to SysStartupCmd when the -startupcmd parameter are specified. SysStartupCmd constructs a child class based on the command: SysStartupCmdBatchRun. The SysStartupCmdBatchRun class instantiates a BatchRun and calls run. Modifying infoRun as this:

void infoRun()
{


batchRun batchRun = new batchRun();
;
batchRun.parmUseForm(true);
batchRun.parmGroupId(parm); // added
batchRun.run();

}

will get your batch server up and running with a specified batch group right from the command line!

This seems to be it, but there is one more problem appears! How to make sure that this Axapta client (aka batch server) always starts when your server is started? Well, you can put it into your windows Startup menu, but then you have to make sure to login with your profile every time server starts! This is not appropriate solution for the server, so we will use standard windows services. To setup user defined windows server we will need to make some small modifications into the windows registry. Here are 6 easy steps to perform:

1. At a MS-DOS command prompt(running CMD.EXE), type the following command:

[path]\INSTSRV.EXE [My Service] [path]\SRVANY.EXE

where path is the drive and directory of the Windows NT Resource Kit (i.e., C:\RESKIT) and My Service is the name of the service you are creating. Example:

C:\Program Files\Resource Kit\Instsrv.exe Notepad C:\Program Files\Resource Kit\Srvany.exe

NOTE: To verify that the service was created correctly, check the registry to verify that the ImagePath value under

HKEY_LOCAL_MACHINE\SYSTEM\CurrentControlSet\Services\service name

is set to point to SRVANY.EXE. If this is not set correctly, the service will stop shortly after it starts and return an Event ID 7000 "The service name failed to start."

NOTE: You should back up the registry before you edit it.

2. Run Registry Editor (Regedt32.exe)and locate the following subkey:

HKEY_LOCAL_MACHINE\SYSTEM\CurrentControlSet\Services\

3. From the Edit menu, click Add Key. Type the following and click OK:

Key Name: Parameters
Class : [leave blank]

4. Select the Parameters key.

5. From the Edit menu, click Add Value. Type the following and click OK:

Value Name: Application
Data Type : REG_SZ
String : [path]\[application.ext]

where [path]\[application.ext] is the drive and full path to the application executable including the extension (i.e., C:\WinNT\Notepad.exe) In our case you should type something like this:

[path to your axapta client bin]\ax32.exe startupcmd=batch_yourBatchGroup

6. Close Registry Editor.

By default, a newly created service it configured to run Automatically when the system is restarted. To change this setting to Manual, run the Services applet from Control Panel and change the Startup value to Manual. A service set to Manual can be started in one of several ways:

- From the Services applet in Control Panel

- From a MS-DOS command prompt, type the following: NET START [My Service]

- Use the Sc.exe utility from the Resource Kit. Type the following from a MS-DOS command prompt:

[path]\Sc.exe start [my service]

where [path] is the drive and directory of the Windows NT Resource Kit (i.e., C:\Reskit).

IMPORTANT: Before you edit the registry, make sure you understand how to restore it if a problem occurs. For information on how to do this, view the "Restoring the Registry" or the "Restoring a Registry Key" online Help topics in Registry Editor.